Obtaining a Japanese Driver’s License in Miyazaki Prefecture
 PDF Version
 Open Document Version
Morris Cornell-Morgan
Revised February 4, 2006
The Procedure
Since 2002, it has not been possible to drive in Japan with an International Driving Permit (IDP) for more than a year without leaving the country for at least three months at some point. Thus, driving JETs who recontract for a second year are required to obtain a Japanese driver’s license. For holders of valid foreign driver’s licenses, the procedure is to technically ‘convert’ (切り替え) their existing license to a Japanese license. The procedure for doing this is described in Japanese on the Prefectural Police website
The 22 Special Countries
France, Germany, Switzerland, Italy, Belgium, Netherlands, Luxemburg, United Kingdom, Denmark, Ireland, Greece, Spain, Portugal, Sweden, Norway, Iceland, Finland, Austria, Australia, New Zealand, Canada, and Korea.
If your current valid driver’s license is from one of the 22 countries listed to the right, you can obtain a drivers license at the Driver’s License Centers in Miyazaki-city, Miyakonojyo, or Nobeoka. Holders of licenses from other countries need to go to the Driver’s License Center in Miyazaki-city (North-West of the JUSCO, near Seagaia; there are signs for it on all the major roads nearby [Map]). If your license is from one of the 22 listed countries, you only need to answer some questions about your driving history and take a brief written test. If your license is from any other country you will also have to take a driving test on their test course, which you are highly unlikely to pass without some level of practice ahead of time.
If you have to take the driving test you can practice on the actual course with ‘private’ instructors (friends of the people who will give you the test) on Saturdays and Sundays. Including fees paid to use the test course, expect to pay about 7500 yen an hour. With a bit of persistence, you can get a full list of instructors from the Center. Foreigners are invariably directed toward a Mr. Hirabara (0985-51-8118), who is recognizable by his distinctive yellow hat. I’m personally indebted to Mr. Taura (0985-23-9561 / 090-3324-0261), who was willing to give me a lesson on short notice and expressed a willingness to instruct other foreigners. Three hours is a good amount of practice time, but you may be able to get away with two. I’ve written down some of the instructions I received in the practice session below, which may or may not be helpful. Bear in mind that the only question you’re likely to be asked when you take the road test is “How many hours did you practice?”
If you have to take the driving test you will generally have to visit the center at least two times, once to have your documents checked and take the written portion of the test and once to actually drive the course. You can still theoretically complete the whole licensing process in a long weekend by visiting the Center for the first time on a Friday, practicing on a Saturday or Sunday, then returning to take the test on the following Monday. The person in charge of converting foreign license is a Ms. Tamura, who is generally quite nice. On the first day you will need:
- Your alien registration card
- Your foreign driver’s license
- Your passport
- 2 photos cut to 3 cm x 2.4 cm (available for about 600 yen at shops by the Driver’s License Center in Miyazaki)
- At least 1650 yen to cover miscellaneous fees
When you submit these documents they will ask you a lot of questions about when you obtained your license, what the procedure is for obtaining a license in your home country, and when you traveled abroad after obtaining your license. In order to determine that you meet the requirement of having spent 3 months in your home country after obtaining your license they will examine all the stamps in your passport in detail. Notable questions include “did you have a learners permit,” “how long did you have a learner’s permit,” “how did you prepare for your drivers license test in your home country,” “did you have a written test to obtain a drivers license,” and “how long did the written test take and how many questions did it have,” among others. I could only guess for some of my answers (“I think it was a 30 question test, and they probably gave me plenty of time—like an hour”), and that seemed to be perfectly acceptable.
After your documents are checked you will be given a 10 question written test, which will be no problem if you have been driving in Japan. Sample questions include “can you turn right on a red light,” “is it O.K. to drive drunk,” and “if a police officer is directing traffic below at an intersection with a traffic light, do you obey the police office or the traffic light.” If you are interested in the specific driving regulations in Japan, you can obtain a ‘Rules of the Road’ pamphlet in English for 1000 yen from the Japan Automobile Foundation.
If everything checks out with your foreign driver’s license, you need to go to the Japan Automobile Foundation (JAF)—or, in theory, your embassy—to get a certified translation of your driver’s license into Japanese. This takes about 20 minutes and costs roughly 3000 yen (Map to JAF Office). If you’re from one of the 22 special countries, you could get your license in a single trip to the Driver’s License Center if you get an official translation ahead of time. If you need to take the test, you may find the next section useful.
The Road Test
The road test is given Monday through Friday at the Driver’s License Center. You can arrive between 8:30 and 9:30, but it’s best to arrive before 9am. Once you check-in you can walk around the course until 9:40. Tests start at 9:50, and unless there’s a sudden crush of foreigners you probably won’t have to wait too long. The test consists of driving one of two short routes around the test course, both starting and ending at the building labeled ➀.
The test starts before you even get in the car. It’s effectively a 5 minute choreographed performance, so perhaps the hardest thing is fighting the habits you’ve developed as an experienced driver and sticking precisely to the script. Before you open the door, look left and right to check for oncoming traffic (there is none, but this is beside the point) and say something to make it clear that you’ve remembered to do this (“safety check”). Sit down, pull the seat forward, buckle your seat-belt, and adjust the rear-view mirror. Start the engine, put the car in drive, and release the parking break. In the following order, put on your right turn signal, check behind your left then your right shoulder for traffic, and finally drive forward a bit. The next step is to get to the far left side of the lane and put on your left turn signal for the first turn. Since there’s a stop sign, come to a complete stop with your wheels just behind the white line (not over it, but not too far back). Before you turn, look right, left, and then check the blind spot on your left for any potential motor scooters or pedestrians. As you will throughout the course, make obvious head movements and say what you’re doing. In this case, for example, you would say something like “left, right, rear” as you do each check. When there are two lanes, always turn into the left lane and then switch lanes if you need to turn again.
On turning
Make tight, precise turns. If you’re turning left from a large road onto a tiny lane on the course, you can easily fail for turning even slightly to the right before turning left. You essentially need to be as close to the curb as possible without actually touching it.
Always look right then left before turning, and if you’re turning left make sure to check your rear blind spot. As always, say what you’re doing, for example “右、左、巻き込み.”
If there’s a stop sign, make sure you come to a complete stop just behind the white line on the ground and within 50cm (30cm would be better) of the curb. If there’s no stop sign, simply check right then left and proceed with caution (as you would with a ‘Yield’ sign in the US).
If there’s a white mark (either a diamond or a circle) on the pavement in the center of an intersection where you’re making a right turn, you want your left tire to be just to the left of it (within 30 cm) as you complete the turn.
On Lane Changes
Each of the two courses in Miyazaki has the potential for two lane changes, marked as by the chess knight (♘) on the map. Put your turn signal on where the star (✰) is, even if it’s far earlier than you might think is necessary. To change lanes, you have to say “one, two, three” as you check, respectively, your rear-view mirror, your side mirror, and your blind spot. Make sure you don’t inadvertently start to drift into the other lane before finally looking forward again after checking your blind spot.
Driving within the lanes
As you drive the course, you generally need to stay on the far right or far left side of the lane. The limit is within 50 cm, but if you can be within 30 cm that would be better. When turning, turn directly to the side of the lane that you need to be on for the following turn (excluding lane changes). If the following turn is a left turn, you want to finish the turn cleanly as close to the left side of the lane as possible. If the next turn is a right turn, stay turn so that you end up on the far right side of the lane. If at all possible, avoid turning to the center then moving to one side of the lane. Places where you will need to be sure to turn directly into the far left / far right lane are marked with a bold L or R at the end of the turn on the map. Finally, it’s perfectly acceptable to drive on the solid white line on the left side of the road. This is actually where your tire should be for much of the course, so as to fall within the 50 cm (30 cm) distance.
Small lanes on the course
There are two points on both courses where you drive on very small roads with very tight turns. As the black line on the map indicates, to complete these turns effectively you need be at the far right side of the small road at the start of the turn. Here, though, there’s some good news. If it looks like you’ll hit a barrier or the curb, you can back up! When you do, though, make sure you look over your left then right shoulders first (as always, saying what your doing as you do it). Interestingly, since there’s no stop sign at the end of the small lanes, you don’t have to come to a complete stop. Instead, look right then left for on coming traffic and proceed slowly (as you would with a ‘Yield’ sign in the US).
Concerning Speed
While it may be tempting to drive absurdly slowly, you need to pay attention to the speed limit. When the speed limit changes from 30km/h to 40 km/h, you should speed up from about 25km/h to about 35km/h. Going too slowly can cost you points. Even if there is a red light at the next intersection, you should speed up a bit in 30km/h and 40km/h zones before coming to a stop. While this isn’t how you would normally drive, it’s important to demonstrate that you’re paying close attention to the rules of the road. Where they’re particularly important, the start of speed zones are marked on the map by their respective speed limits.
On Right of Way
On the course, larger roads almost always have the right of way, with one important exception: By the rules of the course, the road that circles the course always has the right of way. Also, always stop for cars with the right of way well before they will pass in front of you. Even in situations where it would be fine to proceed on normal roads, it’s better to play it safe and stop for cars that would have the right of way at an intersection.
Exiting the course
Put your left turn signal on well before you turn off the main road (near the point marked by a star (✰) on the map), and make sure to check your left blind spot before you make the turn. When you park you need to be within 30 cm of the left curb (i.e. absolutely as far to the left as possible). Park with your bumper beside the yellow and black pole.
Japanese
You can probably get your drivers license speaking almost no Japanese, but here are a few words that might come in handy:
| Japanese | Romaji | Meaning |
|---|---|---|
| 右、左、巻き込み | migi, hidari, makikomi | ‘(I’m checking) right, left, then my left-rear blind spot (for small bikes, scooters, etc.)’ |
| 加速します・アクセル | kasoku shimasu / akuseru | ‘I’m speeding up’ |
| 減速します・ブレーキ | gensoku shimasu / burēki | ‘I’m slowing down’ |
| 右に曲がります | migi ni magarimasu | ‘I’m turning right’ |
| 左に曲がります | hidari ni magarimasu | ‘I’m turning left’ |
| 安全チェック | anzen chekku | ‘Safety check’ (before entering the car) |
| 周囲良し、後方良し、巻き込み良し、右良し、左良し | Shūi yoshi, kōhō yoshi, makikomi yoshi, migi yoshi, hidari yoshi | ‘I’m checking my surroundings, behind me, for anything caught in my left rear blind spot, my right, my left’ |
| 右・左・巻き込みを確認します | migi / hidari / makikomi wo kakunin shimasu | ‘I’m checking right, left, then my left-rear blind spot (for small bikes, scooters, etc.)’ |
| カーブ | kābu | curve |
| 教官 | kyōkan | (driving) instructor |
 PNG Image
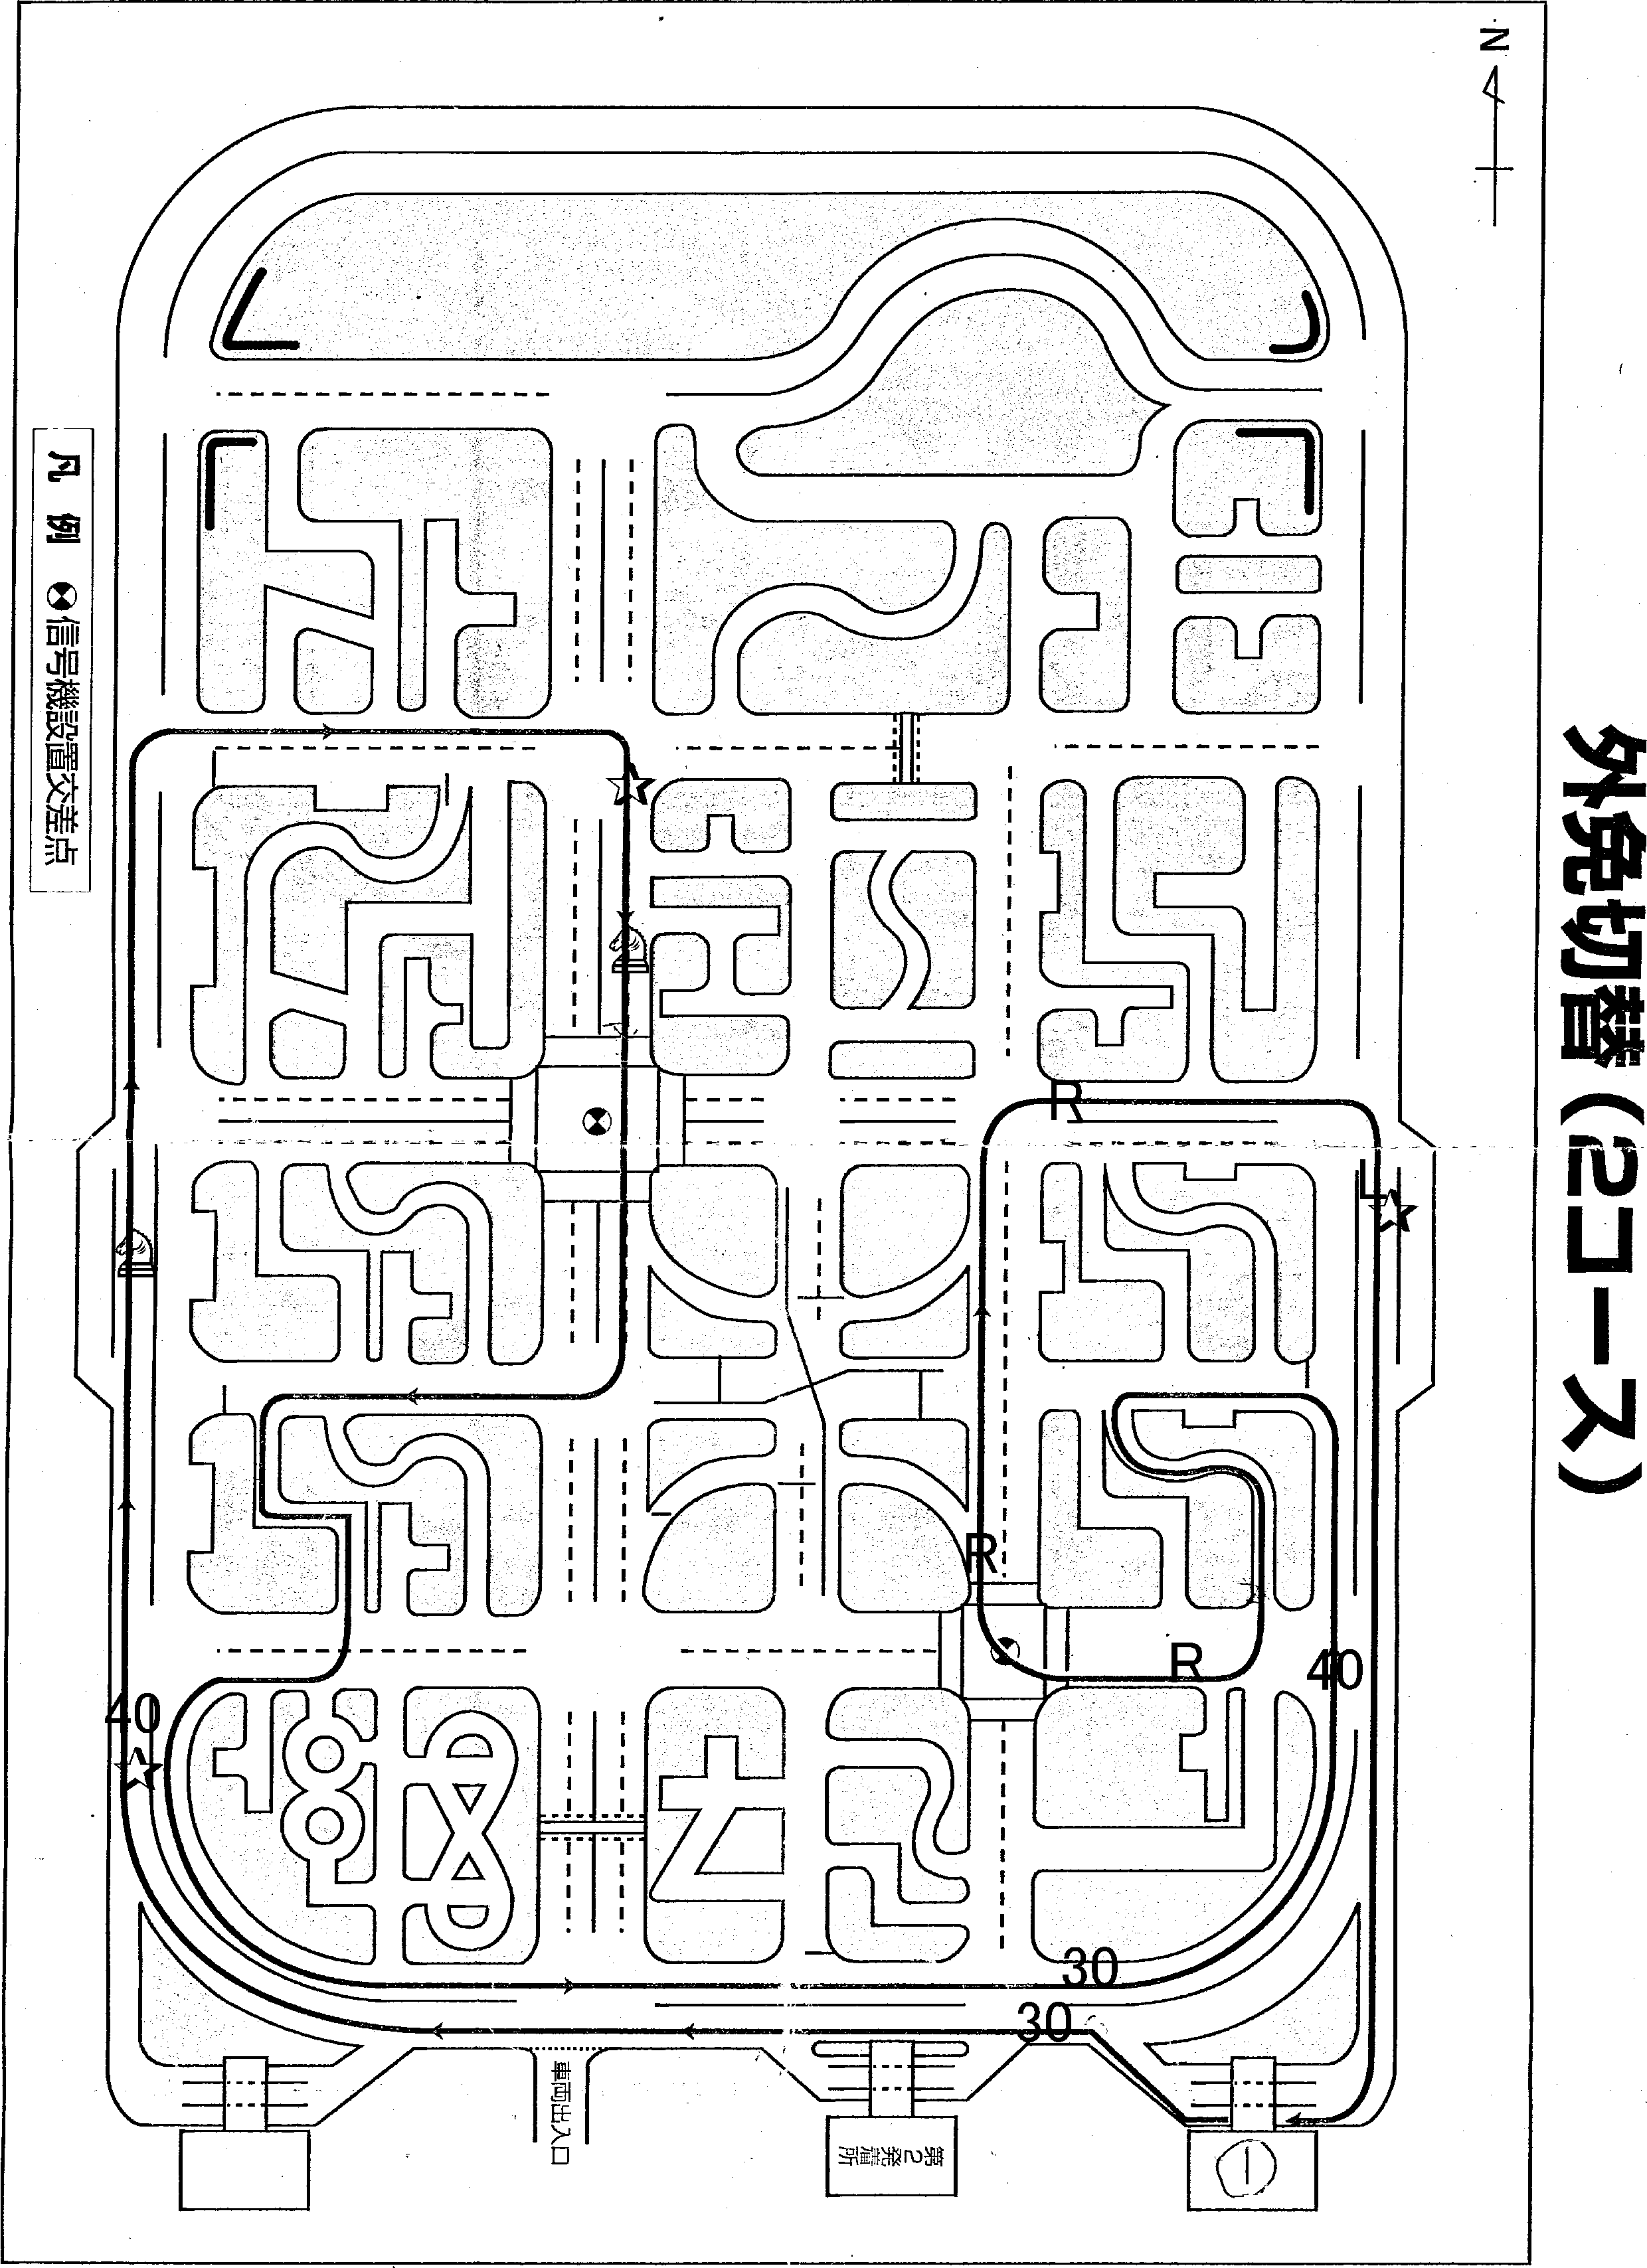 PNG Image
Link
- Japanese Driver's License and Driving Test Tips, by Andy Gray